Introduction: Latte Art – More Than Just Coffee
Latte art is the art of creating decorative patterns and figures on the surface of your coffee – typically a café latte or cappuccino. It’s not just for professional baristas, but can also be learned and enjoyed at home. Latte art elevates the coffee experience because it adds a visual element that makes each cup unique and inviting. In this guide, you’ll get a thorough introduction to how you can get started with latte art yourself, as well as how to achieve the best results, even with regular kitchen equipment.

What is latte art?
Latte art occurs when you pour steamed milk onto espresso in such a way that the foam forms patterns in the cup. The technique requires both precision and practice, but the result can be impressive: everything from simple hearts and rosettas to advanced swans or tulips. Latte art is especially popular in cafés around the world, but with a little patience and the right tips, you can easily master it at home in your own kitchen.
Why make latte art?
- It makes the coffee experience more inviting and personal.
- It shows respect for both the craft and the guest.
- It’s a fun creative challenge that can be perfected over time.
What equipment and ingredients do you need?
To make latte art, you’ll need:
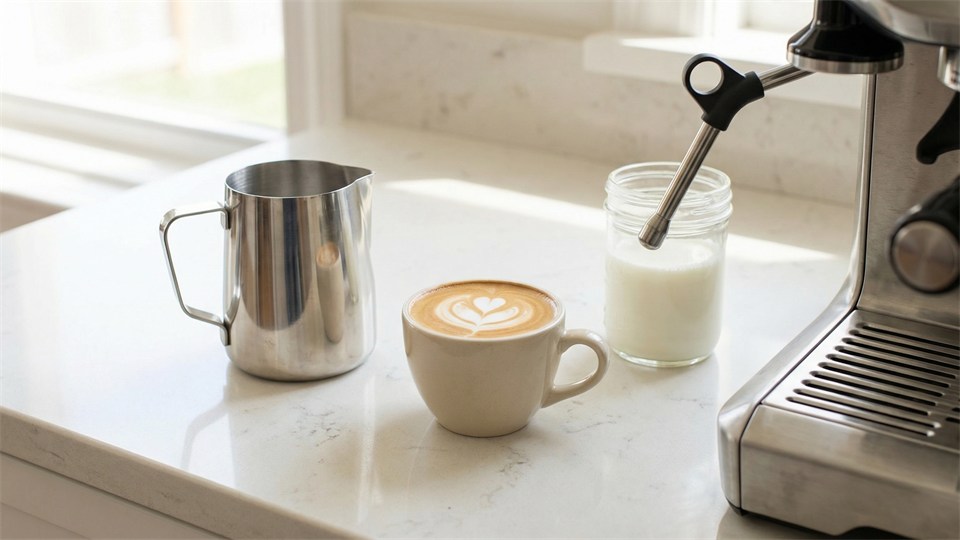
- An espresso machine: Preferably with a steam wand for steaming milk. Some capsule machines also have this function.
- A milk pitcher: Preferably metal, as it gives the best control over pouring and temperature.
- Espresso coffee: Freshly ground gives the best crema.
- Milk: Preferably fresh whole milk – it gives the best foam and shine. Low-fat and plant-based alternatives can also be used, but require more practice.
If you don’t have an espresso machine, you can experiment with strong coffee and a small milk frother, but the best result is achieved with espresso.
How to steam milk for latte art
Good latte art starts with perfectly steamed milk. The goal is to achieve microfoam – smooth, glossy, and creamy milk without large bubbles. Follow these steps:
- Pour cold milk into the pitcher: Fill to just below the spout. Always use fresh milk.
- Start the steam wand: Place the tip just under the surface so you hear a faint "hissing" (air into the milk) for 2-5 seconds.
- Heat up: Lower the steam wand a bit and hold the pitcher at a slight angle. The milk should circulate.
- Stop at 60–65°C: The milk should feel hot, but not scalding. Use a thermometer or stop when the pitcher is too hot to hold.
- Tap and swirl: Gently tap the pitcher on the table and swirl it around to remove any bubbles and combine the foam.
The finished milk should be glossy, silky smooth, and almost look like melted ice cream. Too much or too little foam makes it difficult to create nice patterns.
Step-by-step: How to make a simple latte art pattern
Here we guide you to make a classic heart – the most popular latte art motif. It’s a great place to start for beginners:
- Brew an espresso in a wide cup so a good crema forms on the surface.
- Prepare the milk as described above.
- Pour slowly: Hold the milk pitcher about 5 cm above the cup and pour gently in the center so the milk and crema mix.
- Get closer: When the cup is about half full, lower the pitcher closer to the surface and pour more directly. Now the white foam will start to appear on top.
- Shape the heart: When a white spot forms, move the pitcher slightly back and forth to spread the foam. Finish with a quick "pull" through the center of the spot – this forms the heart.
Start by practicing this pattern before moving on to more advanced shapes like rosettas, tulips, or swans.
Tips for beginners
- Practice with water and soap instead of milk – it gives almost the same consistency, but without waste.
- Watch videos and use slow motion to analyze pouring technique.
- Be patient – the first many cups are rarely perfect!
Popular latte art patterns
Once you master the heart, you can try several classic patterns:
- Rosetta: Resembles a leaf or fern. Requires wavy movements with the pitcher.
- Tulip: Several layers on top of each other – requires precise timing.
- Swan: A combination of rosetta and heart, where a "neck" is added with a pull.
- Free pour figures: E.g. smileys, flowers, or simple animals. Here, your imagination is the limit.
There are countless variations, and many develop their own signature pattern. Feel free to experiment with different cups and types of milk to see how it affects the result.

Why is latte art difficult?
It takes practice to get both the milk and technique to work together. The most common challenges are:
- Incorrect milk foam: Too large bubbles or too little foam makes it hard to draw patterns.
- Pouring too fast or too slow: Too much speed destroys the crema, while too little gives no contrast.
- Cup and pitcher: Cups that are too small or too large can change how easy it is to control the pour.
The solution is to practice and not give up. Even small adjustments in technique can make a big difference.
Creative alternatives and tricks
If you want to make your latte art even more exciting, you can try:
- A "latte art pen" (thin stick): Used to draw detailed patterns in the foam.
- Cocoa or cinnamon: Sprinkle on top of the foam and use a stencil to make designs.
- Plant-based milk: Oat milk and soy milk can also be used, but require a bit more attention when steaming.
No matter which style you choose, the most important thing is to have fun and explore your own ideas.
Conclusion: Anyone Can Learn Latte Art!
Latte art isn’t just about impressing guests – it’s a way to make your everyday coffee experience a little more magical. Start with the basics, practice patiently, and remember to celebrate every little improvement. Over time, you’ll discover that even a simple cup of coffee can be transformed into a small work of art. So grab your milk pitcher and start experimenting – your next cup of coffee is waiting to become a masterpiece!